Showing posts with label Recipes. Show all posts

Thursday, July 12, 2012

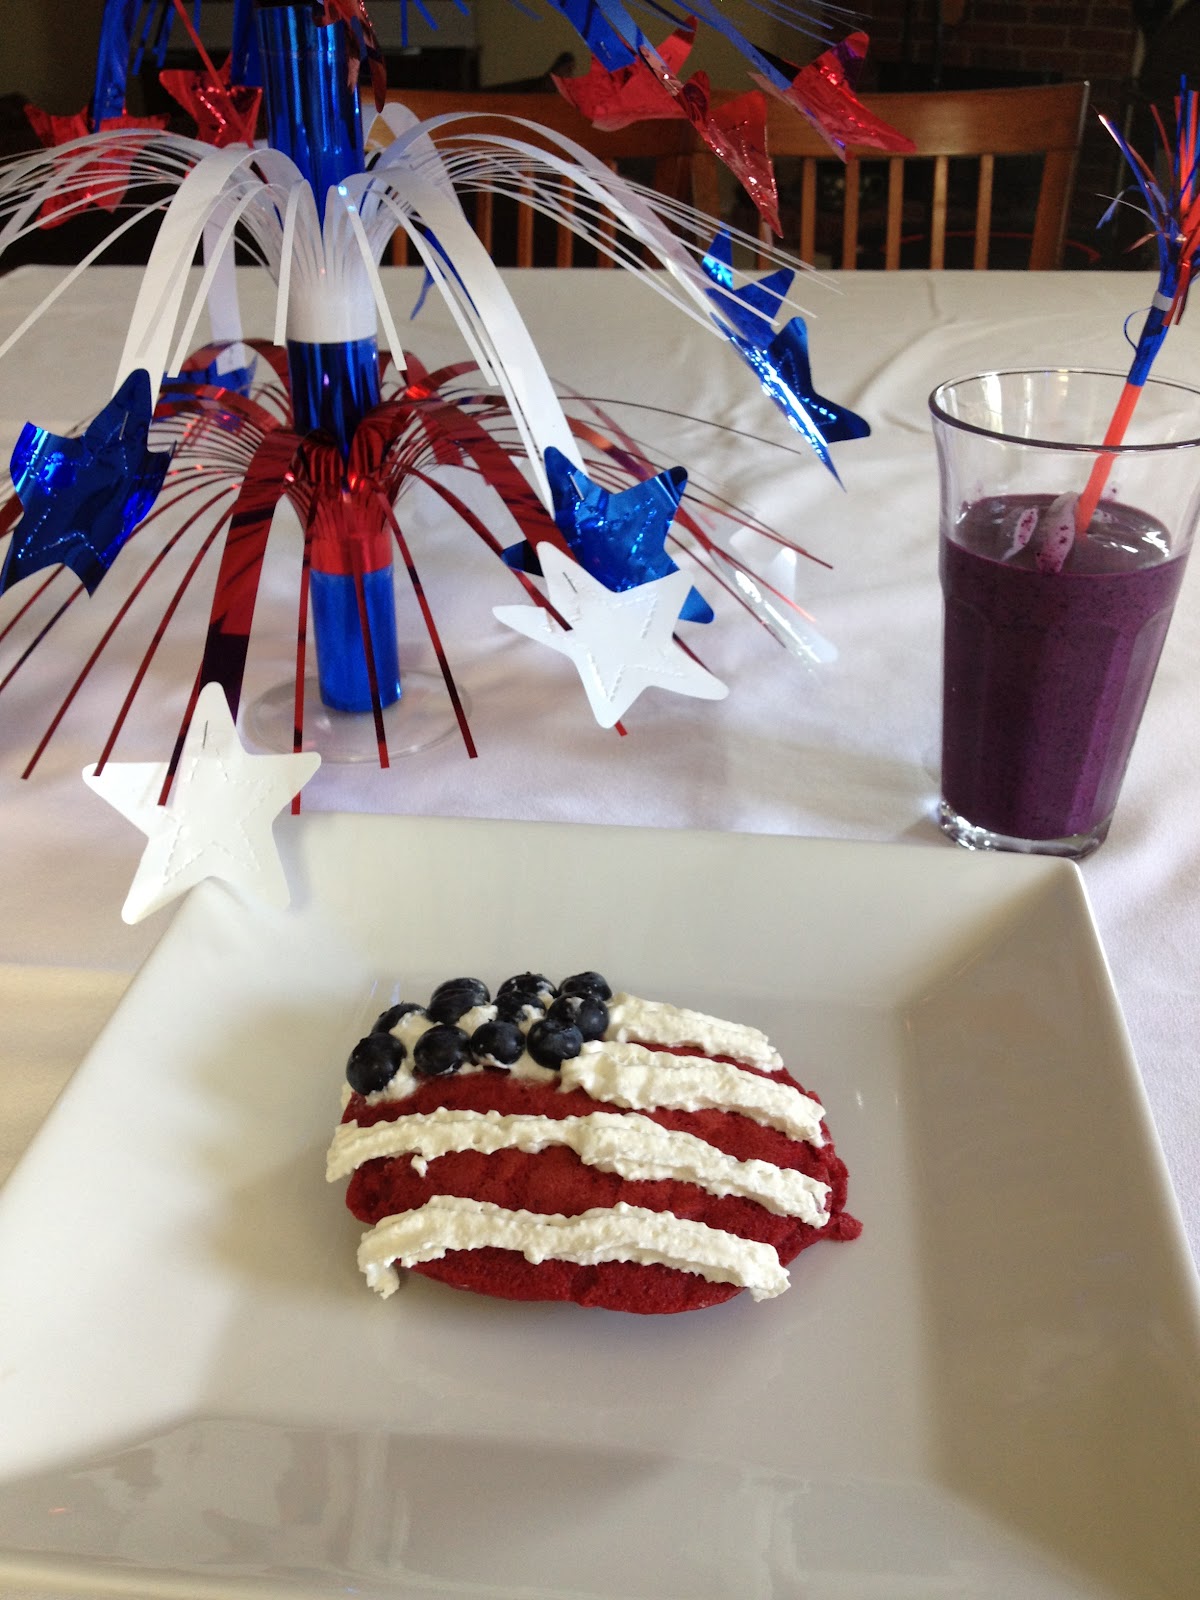
Red Velvet Patriotic Pancakes

I absolutely love red velvet anything!  So when I happened to find Red Velvet Pancake and Waffle mix at World Market for only $3.99 I knew I had found a good thing.  The pancakes are delicious and easy to make.

The mix is beige with no hint of red coloring.
Magically turns red when you add liquids.
  
    
Our patriotic breakfast for Independence Day:  red velvet pancakes and blueberry ice milk.
The drink is Mario Batali's recipe from "The Chew" which is made from only 2 ingredients.

To be honest I did not follow Mario's directions.  I dumped 2 cups of blueberries in the blender and added milk, a touch of agave syrup and flax seed oil.  It comes out much thicker like a smoothie you have to eat with a spoon but it is very healthy and delicious.  Since cow's milk gets such a bad rap next time I will try using coconut milk to be extra healthy.

I used aerosol whip cream for the stripes.  
   
Added a touch of blueberries to make it more festive.
   

My family does not like cream cheese so instead of using a cream cheese glaze they used Log Cabin syrup which does not contain high fructose syrup.  

Cream Cheese Glaze
4 oz softened cream cheese
1/4 cup softened butter (half a stick)
1 cup powdered sugar
1 tsp vanilla
Drops of milk 
Combine all ingredients except milk in a bowl.  Using electric mixer beat until smooth.  Add milk until you get desired consistency.

Blueberry Ice Milk
1 cup frozen blueberries
4 cups cold milk
Thaw blueberries and puree in food processor. 
Strain out liquid from blueberry puree.
Divide the strained liquid among 4 glasses.  Top each glass with 1 cup of milk and stir. 

Recipe video link Blueberry Milk


This post was shared at


Monday, April 2, 2012

Gooey Rice Krispies Treats

I love it when Homer Simpson finds goo and says, "Mmmm....free goo."

For the last few weeks the topic of conversation with my youngest son has been the STAAR test (public school state test).  We've been stressing how important it is for him to pay attention and stop daydreaming.
In order to help with his ADHD I banned junk food and foods with red, blue and yellow dyes and made sure he was taking his fish oils.  It was hard.
Now that 2 of the 4 tests are over I  decided to make a treat for my boys.  Something quick and easy that they both liked.  Gooey Rice Krispies Treats.  My son always asks "Are you going to put the extra marshmallows in?"  Why YES of course, dearie.

For the most part I follow the regular recipe except I add an extra tablespoon of butter and add extra marshmallows at the end.

GOOEY RICE KRISPIES TREATS
4 Tablespoons of Butter (NEVER margarine)
1 Package 10 oz marshmallows or 4 cups AND an extra 1-3 cups marshmallows
6 cups Rice Krispies cereal

Melt butter in a large saucepan over low heat. Add 4 cups or 10 oz marshmallows and stir until completely melted.  Remove from heat. Mix in cereal. Stir until well coated.  Add 1 to 3 cups marshmallows and stir again.  Spread the mixture using a buttered spatula or waxed paper evenly into a 13x9x2 inch pan coated with cooking spray or butter. Allow to cool 10 minutes before cutting the squares.

I normally add more marshmallows that this but this is all I had.  The amount of extra marshmallows you put in is entirely up to personal taste.


Yummy, gooey.

Tuesday, February 21, 2012

Kale Chips and Brussels Sprouts

Who knew kale chips and brussels sprouts were so delicious? Not me and certainly not my children. Below are 3 recipes that I wish I could say I had been using for years because they are so yummy.  More importantly my children could have been eating these nutritious veggies expanding their list of veggies from 6 to 8. 

Of my own free will I would not readily chose to cook kale and have zapped brussels sprouts in the microwave on the rare occassion.  I only contemplated cooking these veggies because in the months leading up to the holidays I saw chefs on TV cooking brussels sprouts in a tempting way. And for years the radio hosts on Martha Stewart's Morning Living radio program have been singing the praises of kale chips.  I was intrigued by how everyone would lavish "yums and mmmmm" over the food, but didn't have the nerve to cook them.  Why not you ask?

2 REASONS WHY I DIDN'T WANT TO COOK THEM
  1. HOURS:  I assumed that making kale chips would take hours. My prior experience with making banana chips was a 17-hour wait using the food dehydrator.  I ate most of the bananas while in the process of dehydrating because it took so dang long. We donated our dehydrator because it occupied up a lot of space and had only used it 4 times.
  2. THE SMELL: I was turned off with the thought of cooking brussels sprouts because...well, frankly they smell like farts when cooking which isn't very appetizing. I had only cooked frozen sprouts before and I assumed the fresh ones would smell worse.
Getting my family to eat healthier has been weighing heavily on my mind. We need to eat more fish and green veggies. I decided it was time to take the plunge. When I got home from the grocery store I showed my husband the brussels sprouts. He was amused that they grew on stalks. He thought they grew in the ground like little cabbages which sounds so cute.  The recipe below is one that I had scrawled on a 3x3 post it note.  I don't remember where I got this recipe. I have recipes lying around the house on various papers and in spirals.
The solution to the bad smell from cooking brussels sprouts is to burn a lot of candles throughout the house while cooking.  The smell does go away and it is definitely worth it!


ROASTED BRUSSELS SPROUTS
  1. Cut sprouts off stalk and remove yellow leaves.
  2. This is when I pre-heat my oven to 400 degrees because cutting the sprouts off the stalks and peeling the leaves can take more than a couple of minutes and I find it wasteful to have an oven on for no reason.
  3. Rinse well in a colander.
  4. Line a sheet pan with parchment paper and tumble sprouts onto pan.
  5. Drizzle with olive oil.
  6. Season with salt and pepper. 
  7. Gently toss to coat brussels sprouts evenly.
  8. Roast for 35 minutes.  
  9. Stir sprouts in the middle of roasting.


FRIED BRUSSELS SPROUTS
Pre-heat about 2 inches of oil at a medium setting.  
Clean and towel dry sprouts.  It is important that you dry the sprouts or the oil will splatter. 
You can cut the sprouts in half if you prefer more of the sprout to be fried. 
Fry brussels sprouts for 30 seconds to 1 minute. 
The sprouts should be light brown.  
DO NOT fry in high heat or the oil will pop like crazy.  
Place on paper-towel lined plate.
Season with salt and pepper.

------------------------------------------------------------------------------------------------------------
KALE CHIPS

Hubby and I want to eat healthier, but we love to eat crunchy things. There's just a satisfaction we receive from the crunch.  However, there's not really a lot of health food that is both crunchy and delicious and it feels as if we are on a never-ending search for healthy, crunchy food that is low in carbs.  
While dropping my kids off at school I heard Betsy Karetnick on the radio talking about kale chips again and she said it was fast and easy to make - not the hours I assumed. 

The Martha Stewart Kale Chips Recipe was a little vague. I was a first time kale user and it didn't say what to do with the stalks. So I searched for more recipes. There were a lot to chose from and I was a little overwhelmed. I am definitely jumping the kale chip bandwagon a little late.  

I found 2 recipes that I liked and combined them to suit my personal way of cooking.
http://www.shutterbean.com/kalechips/   I like this recipe because she used the word "glug" to describe the amount of olive oil to use and presented pictures.
http://eatdrawlive.com/kale-chips/  I like this recipe because it uses coconut oil and spices.

I tried using both oils.  Olive oil gives it a nutty flavor and coconut oil has no flavor at all which is what my kids prefer - no taste.

Rhonda's Kale Chips Recipe
1 bunch of Kale
Olive oil or Coconut oil (I used about 2-4 tablespoons. This really depends on the amount of kale you have)
Coarse salt
Grated Parmesan cheese (optional)

  1. Pre-heat oven to 350.  
  2. Cut the kale leaves off the stalk.  You can tear off the leaves but a knife is faster.  
  3. I leave some leaves large and cut some in half. (large for me; smaller for kids)
  4. Rinse leaves well and dry with a salad spinner but towel drying is fine.
  5. In a large bowl toss the kale with the oil. 
  6. Place kale on parchment-lined baking sheet in a single layer.
  7. Sprinkle salt to taste.  Be careful it's easy to over-salt.  
  8. Bake for 20-25 minutes. 
  9. Upon immediate removal from oven sprinkle with Parmesan cheese so it will melt. 
Salt


Friday, October 28, 2011

Easy Beef Stroganoff (Budget Friendly)

Living on a budget is not always easy especially with the cost of food rapidly rising.  This recipe is very simple and cost friendly.  The most time consuming part of this dish is cutting the meat. 

I always try to buy as much T-bone or rib eye that can fit in my freezer when it's on sale, but sometimes we run out of meat.  Then we get stuck with sirloin tip, top round, or bottom round steaks. The problem is that these cuts aren't very tender. This recipe makes the meat tender with the long hours of cooking at a low temp. You can use any cut of beef for this recipe.

BEEF STROGANOFF
1 can cream of mushroom soup 
1 can French onion soup
1 pound bite size pieces of beef
4 ounces sour cream
6 ounces fresh sliced mushrooms (adjust according to taste)

In oven safe casserole dish mix the cream of mushroom and French onion soups and add cut beef. Cover with foil and cook for 3 hours at 325 F degrees.  30 minutes before done, add 4 oz of sour cream and fresh mushrooms.  Serve over noodles or rice.

Notes
1) If you like lots of sauce you can adjust the recipe to 2 cans of mushroom soup, 2 cans of French onion soup, 1-1/2 lbs of beef and 8 oz sour cream.  
2) Don't use fat free cream of mushroom soup.
3) Adjustment for Low Carb diet is to eat over chopped, cooked cauliflower. The cauliflower is rice substitute.


mix in sour cream

We like lots of mushrooms.


Friday, September 16, 2011

Chocolate Mousse Pie with a Secret Ingredient

I saw the title above on lovefoodeat blog and I immediately thought of Minnie's chocolate pie in the novel The Help and said to myself "Oh, I hope this recipe doesn't have Minnie's secret ingredient."

chocolate-beet-mousse-10


Ingredients:
For the crust
  • 1 cup of whole wheat flour
  • ¼ cup coconut oil
  • 2 tbsp cocoa powder
  • 4 tbsp sugar
  • 5-6 tbsp cold water
For the mousse
  • 1 cup semi sweet chocolate
  • 1/2 cup beet puree
To make the pie crust first place the coconut oil in the freezer/refrigerator till it’s solid and looks like butter. Mix the flour, cocoa powder, sugar and the coconut oil and slowly combine with your fingers. When it resembles bread crumbs add enough cold water to make dough. Keep it in the refrigerator for 20-30 mins. Roll it into ¼ inch thickness and place it in the pie plate. Use your hand to put it together if it breaks or tears. Bake the crust at 210°C for 8-10 minutes or till golden brown. Let it cool completely.

Peel and boil beets till soft and blend it into a smooth puree. Melt the chocolate using a double boiler till smooth. Turn off the heat and let it cool for a few minutes. Now add the beet puree and mix well.

Pour this chocolate beet mixture into the prepared pie crust and smoothen the surface with a flat spoon. Refrigerate for at least 2 hours till it completely sets. If you want it to be not too soft you can even put it in the freezer for 15-20 minutes till it hardens a little.


Serve with whipped cream or ice cream or eat it plain.


*Good recipe for you vegetarian friends.  

Tuesday, September 13, 2011

Watermelon 2 Ways

I take absolutely no credit for these recipes.  The Watermelon Salad and Watermelon Mojito recipes are from Food Network and Martha Stewart respectively. This is about the recipes and what I learned.

A couple of weeks ago my neighbor invited us to her End-of-the-Summer BBQ party. I planned on bringing cupcakes because she and I had a conversation about them last year. When I asked her if I should bring a dessert and she said "No, there are too many desserts already."  Dang! Dessert is easy peasy. But when it comes to bringing a dish to a party I have to put a lot of thought into it. I was also unsure if we would be outside or indoors. After pouring through several magazines I came across the Watermelon Salad in the Food Network July/August issue. It looked bright and fresh. And nothing goes better with BBQ than watermelon. A few days later the host asked if someone could bring a fruit so it was a perfect choice. BTW I found out my neighbor is a great cook. She had the a lot of food and she made it all. I thought the pork & shrimp spring rolls she served were from a restaurant. I took one home and pulled it apart to examine the ingredients so I could try to make it myself.
Watermelon Salad
                                                                                                                Photograph by Antonis Achilleos

Directions

Bring 1/4 cup each sugar and water to a simmer in a saucepan. Remove from the heat, add 3 mint sprigs and steep 10 minutes. Discard the mint; add the zest and juice of 1 lemon and a pinch of salt. Toss with 2 cups blueberries and 3 cups cubed watermelon. Let stand 15 minutes. Top with chopped mint.

My Suggestions:  This is an easy recipe. However, I advise against tossing the blueberries and watermelon together. Some of the blueberries got crushed in the process. Toss each fruit with the simple syrup in separate bowls. I am also the type of person who tries to use the least amount of dishes as possible so I tossed the fruit in the glass serving dish. It made the sides of the bowl grainy and messy from the watermelon. I ended up having to use another bowl and washing another dish. So do not toss in the serving dish. The picture is also misleading. If you toss the fruit together the blueberries end up at the bottom of the bowl. Instead place the watermelon in the dish first and then put the blueberries on top. Gently shake the bowl to get the blueberries to fall between the watermelon.  If you want your salad to look like their picture save some of the lemon zest to sprinkle on top as well.
  

This is my salad. Lighting makes a huge difference between my photo and the one above. The batteries in my camera died so I had to post this pic even though it's not very good. It really did look better, I promise.
 -------------------------------------------------------------------------------------------------------------

Watermelon Mojito
Watermelon Mojito is a perfect cocktail for the summertime.
Yield: Makes 1
Ingredients

  • 4 large mint leaves
  • 1/2 lime
  • 1 tablespoon superfine sugar
  • 4 ounces seedless watermelon, cut into 1/2-inch cubes (about 3/4 cup), plus a small wedge for garnish
  • 2 ounces white rum
  • 1/2 cup ice cubes
  • Directions
  • In a heavy large glass, combine mint, lime, and sugar. Using a muddler, mash together mint and lime until sugar is dissolved. Add watermelon, and muddle until broken down. Stir in rum and ice cubes. Pour into an 8-ounce serving glass and garnish with a watermelon wedge. Serve immediately.

My Suggestions:  This recipe is easy too, but a blender makes it easier. I didn't have superfine sugar or rum on hand. But I did have Amaretto DiSaronno and simple syrup. (The simple syrup is 1/4 cup water and 1/4 cup organic sugar.)  Simply substitute the Amaretto for the rum and the simple syrup for the superfine sugar. Assess how many drinks you want to make and adjust the ingredients accordingly. Blend all the ingredients in a blender and pour. Don't waste your time muddling. Spend your time drinking. 


These two recipes go hand in hand. They both require watermelon and mint. It also helps use all the mint if you had to buy a pack at the grocery store. I did not have any fresh mint on hand as I posted earlier that our drought conditions killed everything.  Note: I used 2 seedless watermelons for these recipes.


These recipes were shared at:
Happy Hour Projects

Wednesday, September 7, 2011

Oreo Stuffed Chocolate Chip Cookie

Yes, the title is correct and not a typo. There is actually a recipe for Oreo Stuffed Chocolate Chip Cookies courtesy of Jenny Flake at the http://picky-palate.com. Let's all give her a round of applause for sharing.


I found the recipe in the mag below. To be honest I would have never bought this magazine because its price tag is $14.99.  But I couldn't resist the Borders 50% discount, the Oreo Stuffed Chocolate Chip Cookie recipe, and the pretty pictures.  Jenny Flake is featured in this magazine with the recipe. But she is so nice that she shares her recipe for free on her blog.

You're probably not even reading what I'm saying right now because your eyes have drifted to the recipe already, right?

 I'm trying to do more organic baking so I used Bob's Red Mill unbleached flour, organic butter, and changed the sugars to 1/2 cup granulated and 1/2 cup organic. I realize that the alterations are a bit oxymoronic considering I'm sticking an Oreo in the middle of the cookie.


1.  Preheat oven to 350 degrees F.  In a stand or electric mixer cream butter and sugars until well combined.  Add in eggs and vanilla until well combined.
2.  In a separate bowl mix the flour, salt and baking soda.  Slowly add to wet ingredients along with chocolate chips until just combined.  
3. Using a cookie scoop take one scoop of cookie dough and place on top of an Oreo Cookie.  Take another scoop of dough and place on bottom of Oreo Cookie.  Seal edges together by pressing and cupping in hand until Oreo Cookie is enclosed with dough.  
4. Place onto a parchment or silpat lined baking sheet and bake cookies 9-13 minutes or until cookies are baked to your liking.  Let cool for 5 minutes before transferring to cooling rack.  Serve with a tall glass of milk, enjoy!
Makes about 2 dozen VERY LARGE Cookies. 
 
Scoop I used. Put a scoop of dough on top and bottom even though that's not in the picture.

On the first batch my son added more cookie dough than the scoop. I didn't know he was doing this until I noticed a difference in our cookies. The extra dough made the cookie really thick and I had to bake it for 4 an extra minutes. The cookies came out fine, but some were a little doughy. Even though the 2 scoops of dough don't seem like enough, trust me it is. Can you see in the pic above how thick the cookies are?

Here's how flat the cookies look when extra dough is not added. The cookies turn out better.

left to right: regular Oreo, Double Stuf Oreo

Definitely use the Double Stuf Oreo. Look at how skinny the regular Oreos are now. Back in my day (I sound so old) the Double Stuff cookie in the picture was our regular cookie, not this paltry anemic disc on the left. And our Double Stuf was actually 2 separate discs of icing - kids don't know what they're missing these days.  


My 2 chocoholics in the house loved these cookies. I brought them over to my dad's birthday celebration and they disappeared rather quickly.


The Smart Tab
I didn't notice that they added this smart pull tab. Without thinking I just cut the end of the package. If I didn't use most of the cookies I would have berated myself for not seeing this.


Triple Double Oreo Review

The Triple Double Oreo looks yummy. Who doesn't sit here and go "ooooo"?  But let's be honest and ask ourselves, "Why do we love Oreos so much?" We love the icing, not the cookie. The chocolate cookie without the icing is just any other chocolate cookie. The Triple Double in my opinion is "too much cookie and not enough icing."  C'mon Nabisco we all know that hydrogenated oils are super cheap. Give us more filling!!


Betcha Didn't Know Tidbit:  
Hydrox is the brand name for a creme-filled chocolate sandwich cookie that debuted in 1908 and was manufactured by Sunshine (later Sunshine Biscuits). Its name was formed from the atomic elements which make up pure water: hydrogen and oxygen.[1] Some accounts report the Oreo—introduced later, in 1912—was inspired by the Hydrox, yet Hydrox suffered from the impression of being a knockoff. Compared to the Oreo, the Hydrox had a "tangy, less-sweet filling" and a crunchier cookie that stood up better in milk.
http://en.wikipedia.org/wiki/Hydrox


These delicious cookies are shared at:
RoCa and Company
Where Nothing Good Comes Easy
DIY Showoff
Happy Hour Projects (super nice host)

Monday, August 29, 2011

Teddy Bear Bread

These baby bear breads are so cute I just wanna eat 'em up.  The blog where I got this pic is in Japanese. It's called "Happy Rainbow 365, fashionable rice every day".  The man's daughter asked him to make these for her. What a good daddy! Using google I translated the site to English but the recipe was still in Japanese. 


After researching I found these 2 translations. The ingredients are exactly alike in both recipes except for the amount of dry yeast.  I don't know who's correct. I will definitely make both recipes, but I'm guessing the 2nd recipe is correct because of the details and pics she posted.  I also need to download a cups to grams conversion chart for the measurements. I wonder if America will ever change to the metric system.

I kept all the measures metric like the original recipe.
Kuma-chan Pan (Little Bear Bread)
200g Bread Flour
10g Sugar
3g Salt
60g Water
60g Milk
10g Butter
1/2 Teaspoon Dry Yeast
1. Warm the milk to just below boiling in a heavy pan. Place the flour and salt into the bowl. Add the milk, lukewarm water, sugar, and yeast. Combine into a smooth dough.
2. Knead the butter into the bread and form a ball. Allow to rise in a warm place until doubled in size.
3. (Just noting how much the dough should double via the picture)
4. Place the dough on a rolling mat. Cut off one gram and divide it into 20 pieces for the ears. Divide the rest of the dough into 10 pieces. Allow them to rest for 15 to 20 minutes on a damp tea towel.
5. Gently dampen the dough all around. Lightly press the two ears each onto the head. (The dough is easier to handle when slightly damp.)
6. Gather up the sides of a tea towel to form channels, placing the dough inside the channels, and allow it to rise until doubled in size once again.
7. If you don’t have a tea towel instead, place the dough on parchment paper-lined cookie sheet. (If you don’t have paper, spray it with water.) Cover loosely with plastic wrap as it rises. (For baking, you’ll be using the paper-lined cookie sheet)
8. For Brown Bears – Preheat the oven to 220 C, lower to 190 C and bake for 15-20 minutes.
For White Bears – Preheat the oven to 190 C, lower to 160 for the first 10 minutes, then lower 130 for the last 5-10 minutes.
(Know that ovens and bake times will vary)
Draw on the face with a food coloring marker.

I found a 2nd translation. 


Kuma-chan pan (Cute bear buns)


Ingredients


  • Bread flour: 200g
  • Sugar: 10g
  • Salt: 3g
  • Water: 60g
  • Milk: 60g
  • Butter: 10g
  • Dry yeast: 2 teaspoons

Preparation

Sift flour.
Heat milk until almost boiling and let cool (this encourages the gluten in the bread).

Instructions

  1. In a bowl, combine the bread flour and salt. Add the water (heated to about 32° C if you’re making this in winter), cooled milk, sugar, and dry yeast. Mix thoroughly. When it resembles one ball, place on a flat surface and knead until a smooth texture is achieved.
  2. When smooth, knead in the butter [which has been melted, then cooled to room temperature] bit-by-bit. Place the dough into a round bowl, cover with plastic wrap, and leave in a warm place. Wait until the dough has risen to approximately twice its initial size. This is the first stage in letting the dough rise.
    Bread dough
  3. It should look something like this after the first rising.
    Risen bread dough
  4. Place the dough on a benchtop or chopping board and prepare the bears’ ears by cutting 20 1g pieces and rolling them into small balls. Cut the remaining dough into 10 equal portions and roll into balls. Place all pieces between a pair of damp cloths (e.g. wrung-out teatowels) for 15-20 minutes (use a timer).
    Dough balls
  5. Squeeze each ball a bit to force out any gas pockets, and then re-roll into spheres. Take each large ball and firmly press two ears onto it. Place a damp cloth over them to prevent any drying-out.
    bears made of bread dough
  6. Gently placing all 10 assembled bears into damp “bread mats”, then put them in a warm place for the second rising stage. Make sure all the bears are oriented upwards (to not disturb their ears). Place a damp cloth over everything. Wait until the bears have roughly doubled again in size.
    [I'm not sure what bread mats are, so I followed step 7 below.]
    Bears ready for second rising
  7. If you don’t have any “bread mats”, take some oven trays and place them on the benchtop. Placing the bears on the trays, spray with a water atomiser. Take some drinking glasses and fill them with water, then place them in various locations around the tray. Cover the whole lot with plastic wrap, gently dropping the wrap on from above. Wait until the bears have roughly doubled again in size.
    Bears ready for second rising
  8. For lightly browned bread, preheat your oven to 220 degrees, then bake the bears for 15-20 minutes at 190 degrees.
    For a white finish, preheat to 190 degrees, bake at 160 degrees for 10 minutes, then drop the temperature to 130 degrees for a further 5-10 minutes. If they start to brown, immediately place an upside-down enamel bowl over them, or cover with aluminium foil. Keep an eye on the bears while baking, because oven temperatures vary and are not always accurate or comparable.
    Now you can decorate your bears with edible seaweed or a chocolate pen to draw the face!
    Finished bear buns
  9. This recipe was written while using “Haruyutaka” flour. Depending on protein level and seasonal variation, the moisture content of your flour may vary slightly, so please be aware of this.
    [I used standard British Strong Bread flour and it worked well.]


Teddy Bear Bread was shared at:

Related Posts Plugin for WordPress, Blogger...